Integrate the UNC Solution for Windows Defender in Config Manager

Hi Everyone, welcome to the new year 2018, hope you had a wonderful time over the holidays.
All the time I have problems to keep devices up to date when I use the Endpoint Protection or the Windows Defender Integration in Config Manager. Ok, this is just what Microsoft recommends implementing for enterprise customers. For sure it works, but most of the time the virus scan definitions on the clients are not up to date and sometimes it needs a user interaction to get the newest updates.The problem in this case is, that all the synchronizations which are needed when you have WSUS/SUP in place take to long. Also, the Deployment Package distribution to your DP’s and all the way down to the client OS “to the Playground” is taking long. On the client the ConfigMgr agent needs to download the newest definition and handles the Bits with the WSUS-Agent and the Windows Defender Agent. At the end the status message has to be sent up to the Database.


In my opinion there are too many agents and too many replicas need. If you keep in mind, that every 4 hours new Definition Update are released, then you see, that all the process need to be aligned very well.


In this case we use a PowerShell script to handle the Download of the new definitions. Then we use the Package and Program replications to DP’s and finally I use the UNC integration from the EP-Policy.


Here we go with the Step-by-Step integration:


Andre Picker has written a PowerShell Script to download the Definition Files:

https://gallery.technet.microsoft.com/SCEP-Definition-Updates-to-fde57ebf


Here I have an updated Version of it:

https://github.com/slaet/SCCM_Scripts/blob/master/downloadscepupdates.ps1


The Only thing you need to modify in the Script is the Path for the Download location


  # Define the target path
  ##################################################################################
  $pathx86 = “C:\Temp\SchedTask\SCEPupdates\x86\”
  $pathx64 = “C:\Temp\SchedTask\SCEPupdates\x64\”


For the Script create a new Folder where the Script can be placed, to add them later to the Scheduled Tasks.


Quick access Desktop Downloads > ThisPC Local Disk(C:) temp > SchedTask Name SCEPupdates downloadscepupdates


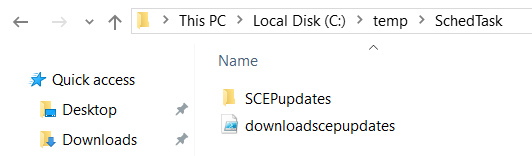
You should also create a Folder in the same or a different location for the files that should be downloaded.

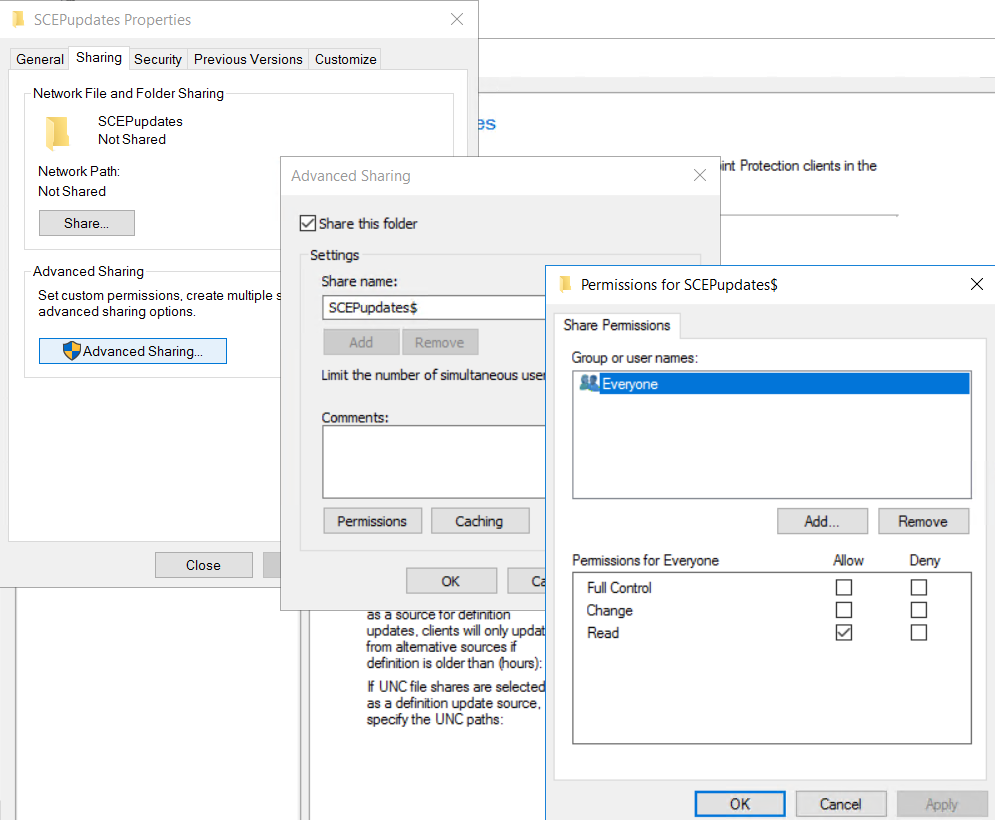
For that Folder, we need also a Share, I just use the Folder name with a $, also hold the default Permissions, like everyone; read.

SCEPugdates Properties General Sharing Security previous Versions Customize Network File and F Sharing SCEPupdates Not Shared Netmrk Path: Not Shared Share..„ Advanced Sharing Set custom permissions. create mulbple advanced sharing options Advanced Sharing. _ Advanced Sharing 91are name: tes$ Protedion cbmts ete Permissions for SCEPupdates$ x Add Renove Litit he Of "nutmeous only frum n_rces f Pens•onz Eveyme Cc—ire Now o o o o is older thal hours): f fie are seled a: defnt.on up"e sou•ce. pecfy the LINC p&hs OK

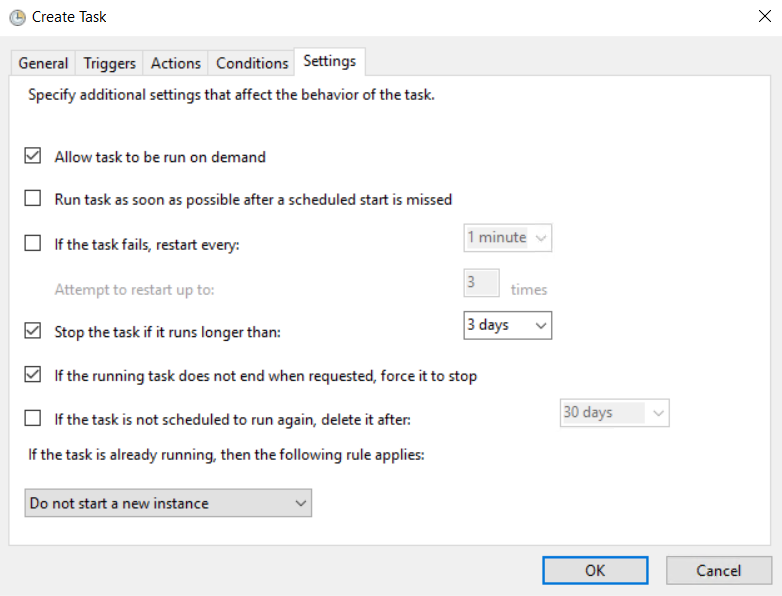
Now we can go to the Scheduled Task Manager and Add a Task:

(9 create Task General Triggers Actions Conditions Settings Download Defender Definitions Location: "Microsoft\Configuration Manager n istrator Description: Downloads the WI ndows Defender Definitions everl hours Security options When running the task, use the following user account: NT AUTHORITY,SYSTEM • Run only when user is logged on Run whether user is logged on or not x Change user or Groupm Do not store password. Thetask will only have access to local computer resources. Run with highest privileges Hidden Configure for: Windows Vista*. Windows Server 2Ü OK Cancel

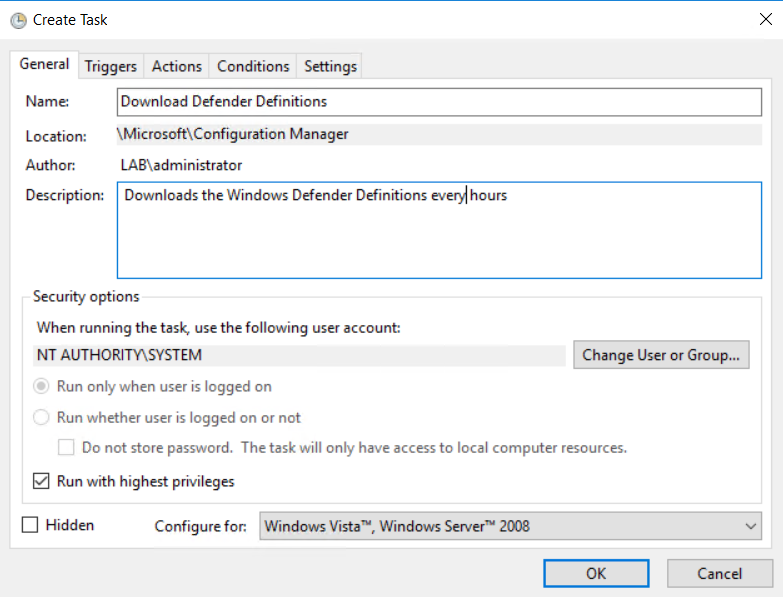
It needs to be running as System

X ー 5 : ま 2 % ・ き 。 上 》 s ロ KepL 40u % 当 P26- - 1-101 & ど ち pui - 3 6utuuru 菴 do ロ 5 三 0 〔 ま 当 も w 。 を ご ) 3 」 。 一 囓 豊 pa ロ 、 4 【 一 ト ロ 日 - 日 【 0 ま 国 ミ 」 & 5 一 sunu セ ま - dc»s ロ 」 nog1 い ま - 新 8 国 動 ち p 動 工 暑 電 uo を 豊 動 石 6 動 8 u を 当 p ど u ・ 、 物 4 肴 を 。 0 必 を 0 p き 3 国 55 一 洋 MBN 必 言 ◎

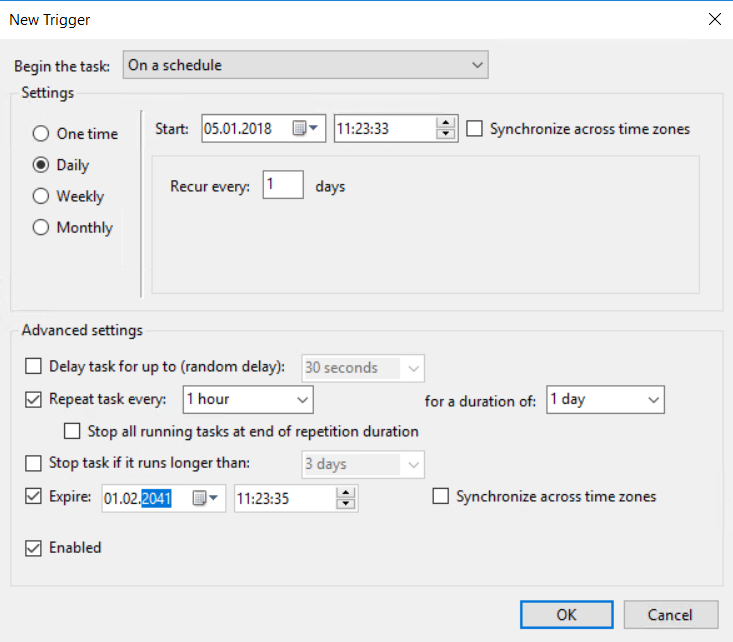
Run the Task every Hour, and every Day
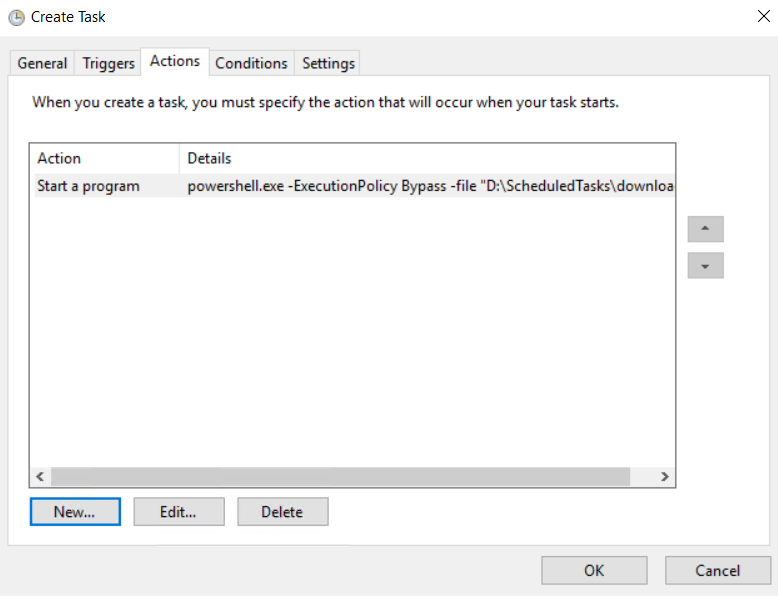
Create Task Geneal Triggers Actions Conditions When you create a task you must specify the action that Will occur when your task starts. Start a program powershdl.ue -ExecutionPoficy Bypass -file

Add the Action with

Poweshell.exe

and the Command

-ExecutionPolicy Bypass -file “C:\temp\SchedTask\downloadscepupdates.ps1”

C' Create Task General Trigges Actions Conditions Settings Specify additional setings that affect the behavior Of the task. Allow task to be run on demand Run task as soon as possible after a scheduled start is missed If the task fails, restart evene Attempt to restart up to: Stop the task if it runs longer than: I minute v times 3 days If the running task does not end when requested, force it to Stop If the task is not scheduled to run again, delete it after: If the task is already running, then the following rule app lies: DO not start instance

For testing, you can run it the first time manually, to see that the files can be downloaded in the two folders (it can take a little while).

Task Scheduler (Local) v Task Scheduler Library v E-licrosoft configuration Ma, > Windows XbIGameSave Content Usa... ?cxnlcad Status Rea dy Trigg ers At every day Next Run Time %01.2018 P roperties Delete Last Run Time 05.012018 Last Run Result (OXO) Author Created Microsoft

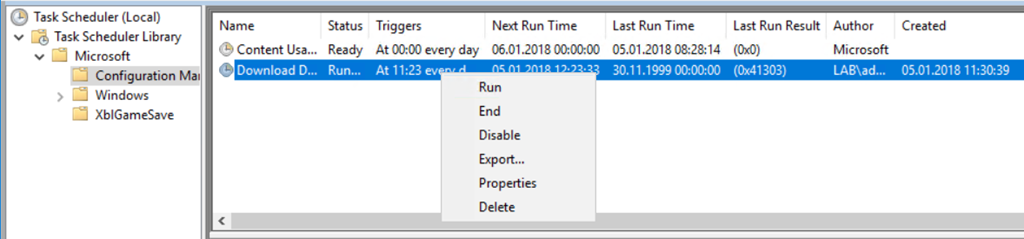
I have exported the XML, you can download it here:

https://github.com/slaet/SCCM_Scripts/blob/master/Download%20Defender%20Definitions.xml


And just add/import it to your Scheduled Task, control any setting and run it for testing.


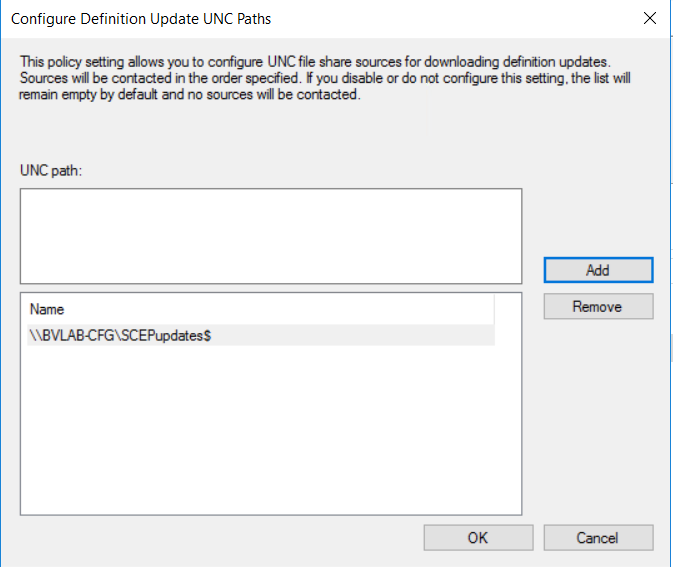
As next we go to the Antimalware Policy and change the order for the Sources. I just set the UNC Path as first option, as the second ConfigMgr and third MS Update and Microsoft Malware Protection Center. The last option is needed to protect the clients in the internet.

Default Antimalware Policy Scheduled scans Scan settings Default actions Real- time protection Exclusion settings Threat overrides Cloud Protection Service Definition updates The thä you this poky to al Pmtedicm the He•-nhy CIAom p&zies ovende poky Check for En$or-t 8 déntions a burs): (O — dis*le che& for 02m dén&ons daiy Oråy cot-fig_rable f Revs based check Configure Definition Update Sources Force dént•on cieM cortVLt« is than two SA n-rces md Er-dgont Prctection as a surce for up"es. ciets wil frorn * —native dénticn is than f fie ha-es are as a déntion ucoe necfy LINC T•is to frur. *wes from Wcroscft Lbd*es frun Wcros&t M*wue Prctection D '&ddes from OK

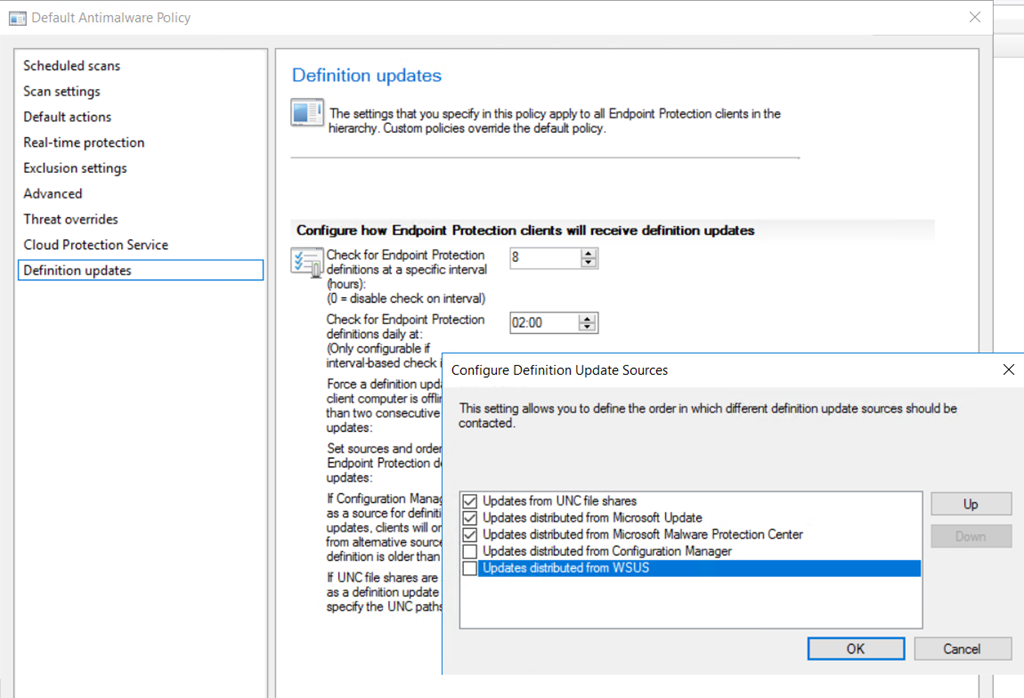
In addition I need to add the path to the share I created. It is the root folder, the client can handle the x86 and x64 Folder by himself.

X 5 を ed ソ っ 当 2 区 コ を を 一 20 2 」 & を O) S ー 耄 fid ッ 円 ` 5 円 ン 0 鬟 コ

Do not Forget to enable the UNC in the Client Settings:


This Step by Step is for a single Primary Site with no DP’s and no Branch-Cache or any bigger network with different Location.


If you would like to Implement that in a “Big” Environment with multi DP’s then you can add A Packages with no Program, and replicate it to all DP’s, use the Share integration from the Package and Just change or add the UNC Path’s, or maybe add a new Antimalware Policy with separate paths to the different UNC Shares and Deploy them to the right collections, that clients in separate Collections just use the correct path.


Here are the steps to create the Package:


The Creation of the Package is simple, just add the UNC Path to the sources root folder

and create the Package without a Program.

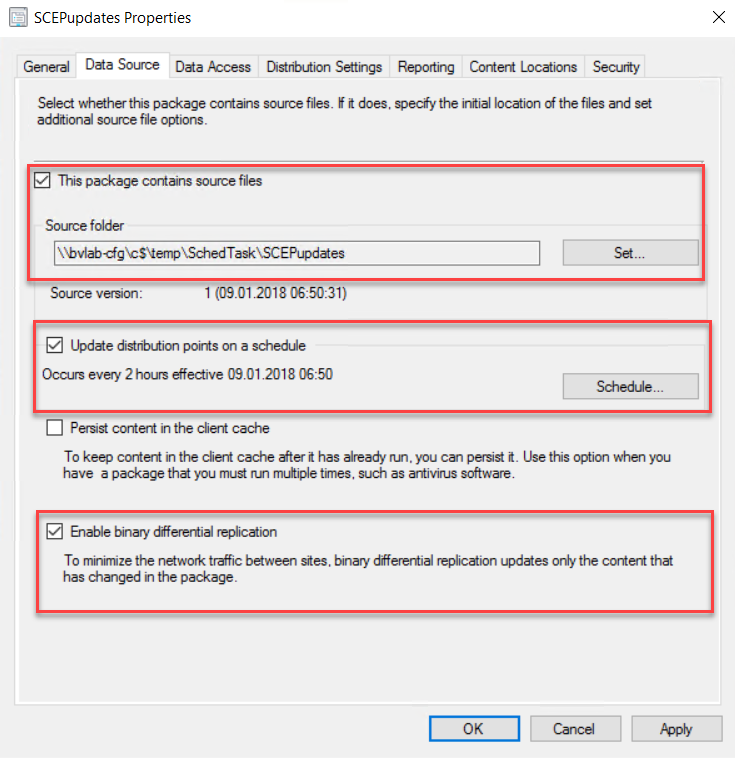
Then go to Properties of the Package and modify in the Data source tab the automatic update to every 2 hours and also enable the differential replication.

SCEPupdates properties D" Sarce Reportinq CortertLoc&ions Secuty Select whetherthis package cor1Ms sa.rce N«. f t does. irdid bc&iorl '"d .d&iorld souce fde ΤΜ pack.ge "l.rce fdes Souce fd±r Occum 2 09.012018 Ρ." ή cher•t c.che Το ή c.che gter t h. *eudy ρ«" t. tha γαι rru_kiple "'h En±le Το tr#c baween b•nn• ody tha h. ch.--ged ή the οκ

In the Data Access Tab enable the copy content in this package to a share on the distribution point.

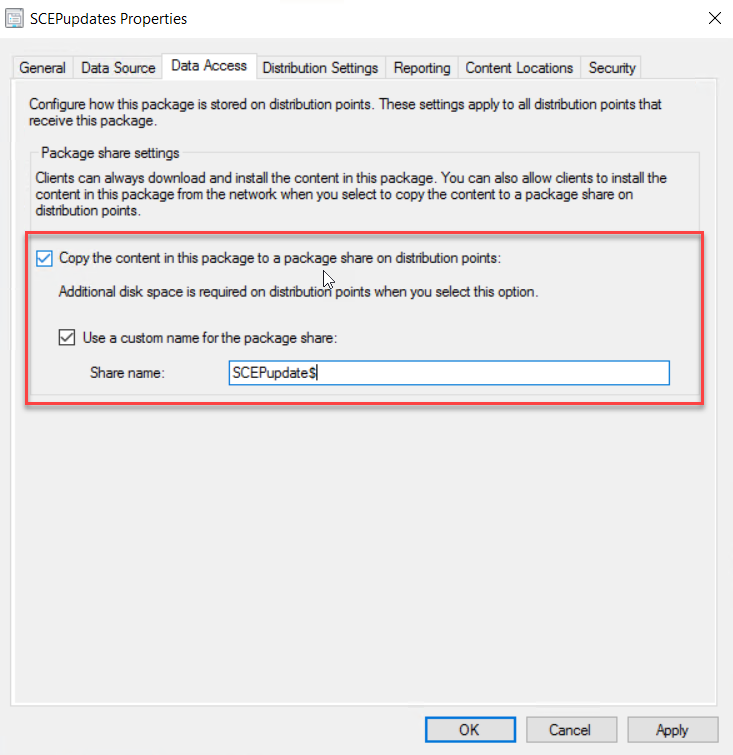
This will end up as a Folder that is shared in the Root of the DP

Computergenerierter Alternativtext: Home Local Disk (C:) Share View •T' > ThisPC > Local Disk(C:) Name Search Local Disk (C:) * Quick access Desktop Downloads Documents Pictures SCEPupdates SchedTask temp inetpub PerfLogs Program Files Program Files (x86) Remotelnstall SCCMContentLib SCEPUPDATE$ SMS_DP$ SMSPKG SCEPUPDATES Properties General Sharing Security Previous Versions Newolk Re and Folder Shamg SCEPUPDATES Network Path: "xepL0dateS x CIAorWze

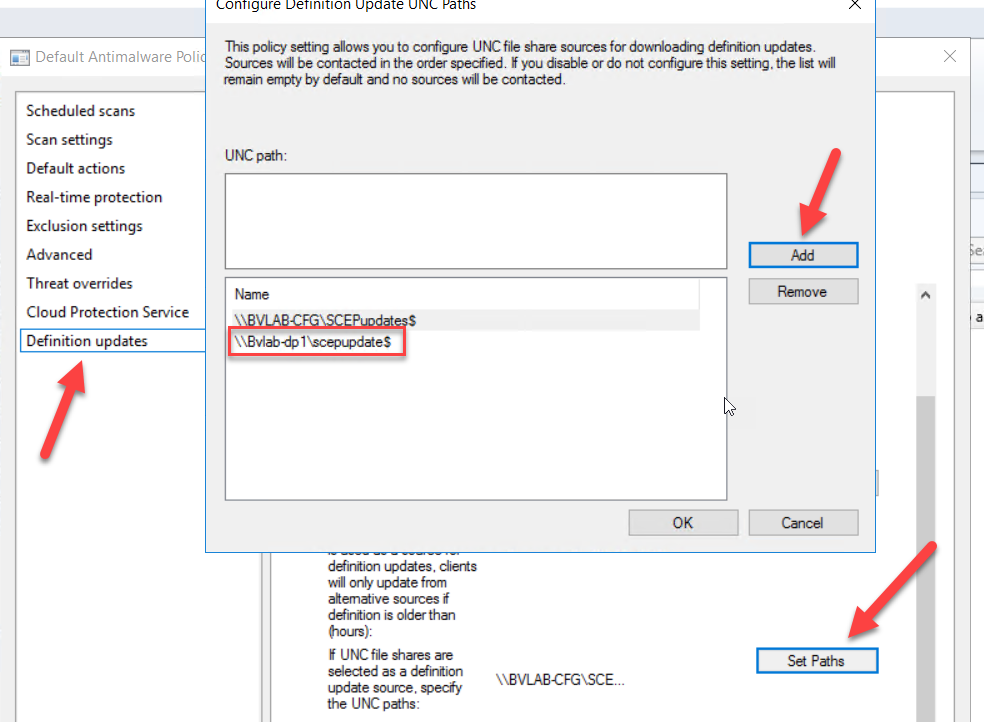
Now you can use that share to add them in the Antimalware Policy as an additional source location

Computergenerierter Alternativtext: Default Antimalware Poli Scheduled scans Scan settings Default actions Real-time protection Exclusion settings Advanced Threat overrides Cloud Protection Service Definition updates conTlgure ueTlmtlon u This policy anows pu to configure I-INC file share sources for downloadng defintia-l updates. Sources wd' be contacted the order specified. f you disable or do configure this setting, the [st remain ZIP•ty by defaut and no 301_rces wd be contaded. I-INC path: 1 "scepupdateS ddinition updates, clients onb' from anernative sources f dérRion is older than hours): F I-INC fie shares are Set Paths selected as a defintion update source , speciy the I-INC Nhs:

That’s it…


Hope it helps and saves you some time to enjoy a beer 🙂, this Post is as is, test it first and do your test in a LAB before implementing it to Production.


Have
a Wonderful Day

Here is also another cool solution to do updates during the Tasksequence in Config Manager or MDT, thank you Jörgen for Sharing.

http://ccmexec.com/2016/1/download-and-deploy-windows-defender-definitions-for-windows-10-during-osd/


Comments

Leave a Reply

Follow

Get every new post delivered to your Inbox

Join other followers:

%d bloggers like this: